Blog

Scripting with Java II – Reducing Formality

In the previous article on Scripting with Java, we looked at how Java became more approachable as a scripting language using the java launcher to execute single source file Java applications. This allows Java to have the typical ‘write-execute’ development loop that other scripts languages have.

Another trait common among script languages is they have very little formality. To address concerns around the "verbosity of Java" Project Amber was launched in the OpenJDK with the goal of improving developer productivity and experience when writing in Java. In this article we will look at some of the changes introduced to the Java language as a part of Project Amber and how it helps to make Java a more pratical choice to write scripts in.

Code Example

The example we will be using to explore some of the Java language changes is a simple script for scanning text files for a phrase. This script will need to accept user input for; a phrase to search for, the directory to search in, and the file type that will be searched. The script will also need to print formatted messages to the console and display the results of a search. Let’s take a look at how some of the new language changes in Java make these tasks easier to accomplish.

The full code example can be seen here: LogScanner.java

Writing and Formatting Multi-Line Messages with Text Blocks

Printing a multi-line and formatted messages to console is a common need when writing a script. Messages could be needed for providing information on how to use the script, results, or when an error occurs. Working with a multi-line formatted string has often been a painful experience in Java. Introduced in Java 15, JEP 378, Text Blocks aims to address this pain point.

A text block begins and ends with the triple quote delimiter: """. Within the """ formatting and line separations are preserved without requiring escaping or declaration (i.e. \n or \r is not needed to create a new line). Here in the below example, a welcome message is defined:

var welcomeMessage = """
        Welcome to log scanner!

        Enter the phrase you want to search for and the directory you want to search in.
           
           Author: Billy Korando
        """;

System.out.println(welcomeMessage);

Which when printed to the console looks like this:

Welcome to log scanner!

Enter the phrase you want to search for and the directory you want to search in.

   Author: Billy Korando
   

Note that along with the line breaks, even the indentation of Author: Billy Korando is preserved. For more information on how to use Text Blocks including rules around incidental whitespace, be sure to checkout the Programmer’s Guide to Text Blocks.

Declaring Variables with var

In the previous example, you might had noticed that though welcomeMessage is a String, it’s declare with var. This is an example of Local-Variable Type Inference, a feature added in Java 10, (JEP 286. This changed allows local variables, variables declared within the scope of a method body, to be decalred with var instead of a type. Like in this example:

var logStatements = new ArrayList<LogStatement>();

In the above example the actual type is ArrayList<LogStatement>, which is clear enough from the new ArrayList<LogStatement>() on the right side of the assignment operator. Instead of having the declare logStatements as ArrayList<LogStatement> (or more commonly, List<LogStatement>), logStatements can simply be declared with the var and the compiler can infer the type.

While not significant, var can be helpful to reduce some of the cermony when declaring variables in Java when it’s clear what the type should be like in the above example. The addition of var also brings Java into line with many other statically typed languages like C++, C#, Go, and others, which all have a similar type inference capability. For more of recommendations on how to use var, be sure to check out the Local Variable Type Interface: Style Guidelines and the Local Variable Type Interface FAQ.

Creating Data Carriers with Record

Processing data is at the heart of computing, be it in an application or in a script. Often the first step in data processing is defining a data carrier to place data into. Here Java has seen a significant improvement with the introduction of Records, (JEP 395), as a part of Java 16.

Creating a simple data carrier class historically required quite a bit of ceremony in Java; a constructor, accessor(s), and if you were going to check the value of data carriers, implementation of equals() and hashCode(), toString() is also a common need for easy printing of the contents of a data carrier. While IDEs have traditionally supported code generation of these methods, defining a data carrier class within a method was impractical as defining; constructors, accesors, equals(), hashCode(), and toString() often required dozens of lines of code or more. Additionally if changes were made to the fields of a data carrier class, the code generation would have be manually re-run, which if skipped, is an opportunity for bugs to enter a code base.

Records were designed for the concise modeling of data as data in Java. In the example, the record LogStatement collects the file name and full log message that contains the phrase, from the file where the phrased being search for was matched:

record LogStatement(String fileName, String logMessage) {
}

var logStatements = new ArrayList<>();
for (Path p : logFiles) {
    String fileContents = Files.readString(p);
    Stream.of(fileContents.split("\n")).filter(l -> l.contains(searchTerm))
            .forEach(l -> logStatements.add(new LogStatement(p.getFileName().toString(), l)));
}

logStatements.stream().forEach(System.out::println);

While in this example, we are simply using the implementation of toString to print the results, we could, for example, also use the implementation of equals to count how many times to the same line is printed within a file.

Assigning Value with Switch Expressions

Switch Expressions, added in Java 14 (JEP 361), are a great way of more succicntly handling evaluations that have n paths. Here in the example below, a switch expression is being used to set the file extensions of the file(s) to be searched based on user input:

private static String selectFileType() throws IOException {
    String fileMessage = """
            Select the type of file you'd like to search:
            1. .log
            2. .txt
            3. .md
            Your selection: """;
    System.out.print(fileMessage);

    var fileTypeSelection = new BufferedReader(new InputStreamReader(System.in)).readLine();
    return switch (fileTypeSelection) {
    case "1" -> ".log";
    case "2" -> ".txt";
    case "3" -> ".md";
    default -> {
        System.out.println("Invalid selection");
        yield selectFileType();
    }
    };
}

With switch expressions, only code to the right of the -> is executed, so a break statement is not needed. This behavior also prevents accidental fall through, a common soure of bugs when using a switch statement.

A switch expression can return value as in the example above, which helps to make code more succinct by not requiring an assignment statement (i.e. var x = y;) in every applicable case. Switch expression can also execute code blocks, like in the default case, and a case block will need to end with a yield statement, if the expression is returning a value (or throw an exception).

Switch expressions are required to be exhaustive. In many cases this will often mean defining a default case will be required, but if all paths are covered by a case, as in this example using an enum, a default case is not required.

Conclusion

Project Amber has made considerable progress toward reducing verbosity in Java, helping to make Java a more practical choice for writing scripts in. Project Amber is an ongoing effort and new features in active development include Record Patterns and Array Patterns (JEP 405) and Pattern Matching for Switch (JEP 406), which build upon Records and Switch Expressions respectively. As these changes continue to be added to Java, this should continue making Java a more productive language to write in.

While this article has primarily focused on the language changes that have been introduced to Java in recent releases, there are active efforts ongoing in other areas. A new HTTP Client API was introduced in Java 11 (JEP 321) which support HTTP/2. Convience Factory Methods for Collections, added in Java 9 (JEP 269), allow for easy creation of Lists, Sets, and Maps, with the .of factory method.

One area we haven’t yet touched on is improving startup performance. When running the code examples in this series you might have seen a small, but noticable delay when executing the code with the java launcher. While less, there is still even a small delay when using the java launcher against a compiled class. In the next article, we will take a look at how to improve the startup performance of short running Java applications.

The full code can be found in my GitHub repo here: https://github.com/wkorando/scripting-with-java/tree/article-ii
Scripting with Java – Improving Approachability

Historically Java has not often been thought of as a scripting language. This belief stems from concerns of Java being a compiled language, being “too verbose”, and having poor startup performance.

Recent changes to the JDK and the Java ecosystem however have begun to address these concerns, which we will explore in this article series. In this first article we will focus on how a change introduced in Java 11 can allow Java to behave like a script language in certain cases. The second and third articles will focus on reducing language formality and improving startup performance respectively.

Why Script with Java?

There might the question of why write scripts with Java at all? There are a couple of answers to this question. The first, if your primary role is a Java developer, writing scripts in Java means you can immediately bring all the experience and knowledge as a Java developer with you when writing a script to simplify or automate a task.

The second is that Java offers an improved feature set, tooling, and structure when compared to scripting languages. While for very simple scripts this might not be relevant, or in the case of structure, a small burden, as a script increases in size, complexity, and particularly importance within your organization, the additional feature set, tooling, and structure that Java offers can be extremely beneficial.

Single Source File Execution

One barrier to using Java as a scripting language is that it’s a compiled language. Before Java can be executed, it needs to be compiled into bytecode. While this is still true, JEP 330, part of JDK 11, allows for single .java source file to be directly compilation and executed in a single command by the java launcher.

Script writing is often a tight development loop of write, execute, write, execute, and the additional step of compiling disrupts this development flow. By combining compile and execution into a single step by invoking the java launcher, this makes Java more approachable as a language for writing scripts.

There are several ways to use this feature, let’s take a look at each of them.

Executing with the java Launcher

The most straightforward way of executing a Java source code file is from the command line with the java launcher. From the directory where the source file is located, the code can be executed simply with:

java [source code file] [arguments]

In a “Hello Name” code example, executing it would look like this:

java HelloJava.java Billy

And produce this:

Hello Billy

Executing using shebang

Running a single Java source file can be further refined with a shebang #!.

At the top of the source file add a #! line that points to the bin directory of your JDK installation and the argument --source version, like below:

#!/path/to/your/bin/java --source 16

public class HelloJava {

    public static void main(String[] args) {
        System.out.println("Hello " + args[0]);
    }

}

Then modify the file to be executable:

chmod +x

And remove the .java file extension

This allows the Java file to be executed like a normal bash script:

./HelloJava Billy

Note: Shebang only works with Unix like systems. For use on a Windows OS either a tool like cygwin will need to be used, or Windows Subsystem for Linux.

Adding source file to PATH

For further convenience a Java source file, configured like the above with a shebang, can be added to a system’s PATH to allow for easy execution from any location on a system. The exact steps for adding a file to your system’s PATH will vary depending upon your OS, so here is a handy link on how to update your PATH for the OS you are using: What are PATH and other environment variables, and how can I set or use them?

Odds and Ends

Most Java developers are very familiar working with larger applications utilizing frameworks, build tools, and packaging applications in JARs or WARs. However when writing and executing Java applications as a script from the command-line there are a couple of things to remember.

Single Source File, Multiple Classes

Typically Java developers define only a single top level class within a source file for readability and consistency purposes, however defining multiple classes within a single source code file is entirely valid and can be done like in the below example:

public class MultipleClassesInSameFile {
    public static void main(String[] args) {

        System.out.println(GenerateMessage.generateMessage());
        System.out.println(AnotherMessage.generateAnotherMessage());
    }


}

class GenerateMessage {
    static String generateMessage() {
        return "Here is one message";
    }
}

class AnotherMessage {
    static String generateAnotherMessage() {
        return "Here is another message";
    }
}

When executed:

java MultipleClassesInSameFile.java 

Produces the following output:

Here is one message
Here is another message

Just keep in mind that while multiple classes can be located in the same Java source file, when compiled each class will have it’s own dedicated class file. So the above code example, when compiled will produce the following files:

MultipleClassesInSameFile.class
GenerateMessage.class
AnotherMessage.class

Note: This also applies to inner classes, a class defined within another class, which will have a class file name like this: OuterClassName$InnerClassName.class.

This will have relevance in the third article in the series when we look at improving performance of scripts written in Java.

Configuring classpath

When referencing classes that are not part of the JDK, you will need to configure the classpath to include the location of these classes. In the below example of using the RandomUtils class from the Apache Common Utils library:

import org.apache.commons.lang3.RandomUtils;

public class GetRandomNunber {

    public static void main(String[] args) {
        System.out.println(RandomUtils.nextInt());
    }

}

While the code is contained within a single file, attempting to execute with the java launcher will cause the following error:

GetRandomNumber.java:1: error: package org.apache.commons.lang3 does not exist
import org.apache.commons.lang3.RandomUtils;
                               ^
GetRandomNumber.java:6: error: cannot find symbol
        System.out.println(RandomUtils.nextInt());
                           ^
  symbol:   variable RandomUtils
  location: class GetRandomNumber
2 errors
error: compilation failed

Adding the commons-lang3-3.12.0.jar jar to the classpath resolves the error:

java -cp /path/to/commons-lang3-3.12.0.jar GetRandomNumber.java 

The classpath, along with other relevant JVM args, can also be defined in the shebang line:

#!/path/to/your/bin/java --source 16 -cp /path/to/commons-lang3-3.12.0.jar

Conclusion

Being able to directly execute a single source code file helps to make Java more approachable for scripting. No build tools, beyond the JDK itself, are needed, and the single step to execute the script helps with a rapid development cycle commonly desired when writing scripts.

In the next article we will take a look at how recent changes have reduced the formality and “verbosity” of the Java language, and how this helps when writing scripts.

The code for for article can be found on my GitHub repo here: https://github.com/wkorando/scripting-with-java/tree/article-i

Transforming Data Transformation in Java with Local Records

Data transformation is a common task for Java developers. When moving data from one location to a new one, and this could be from one datastore to another datastore, such as in a ETL batch process, or retrieving data and sending it to the presentation layer, some amount of data transformation is often required.

While not difficult, performing even simple transforms in Java often means writing a lot of code. Developers will need to create one or more classes with all the associated member fields, accessor methods, and implementing hashCode(), equals(), toString(), and so on. In this article we are going to look at how with the introduction of Records in Java 16 data transformation can be a lot easier.

Java Records

Records, after two rounds of being a preview feature in Java 14 and 15, is becoming a permanent feature in Java 16. Records are a new feature designed to address concerns relating to the definition of data carrier classes in Java including; the proper implementation of hashCode() and equals(), handling of immutable data, and the serialization, de-serialization, and initialization of data carrier classes. For this article we will be focusing how Records aims to make the definition of a data carrier class more concise.

First, let’s understand the issues with defining a data carrier class in Java before Java 16. Before Records, creating a data carrier class would commonly look something like this:

public class Person {

	private long id;
	private String firstName;
	private String lastName;

	public Person() {
	}

	public Person(long id, String firstName, String lastName) {
		this.id = id;
		this.firstName = firstName;
		this.lastName = lastName;
	}

	public long getId() {
		return id;
	}

	public String getFirstName() {
		return firstName;
	}

	public String getLastName() {
		return lastName;
	}

	public void setId(long id) {
		this.id = id;
	}

	public void setFirstName(String firstName) {
		this.firstName = firstName;
	}

	public void setLastName(String lastName) {
		this.lastName = lastName;
	}

	@Override
	public int hashCode() {
		final int prime = 31;
		int result = 1;
		result = prime * result + ((firstName == null) ? 0 : firstName.hashCode());
		result = prime * result + (int) (id ^ (id >>> 32));
		result = prime * result + ((lastName == null) ? 0 : lastName.hashCode());
		return result;
	}

	@Override
	public boolean equals(Object obj) {
		if (this == obj)
			return true;
		if (obj == null)
			return false;
		if (getClass() != obj.getClass())
			return false;
		Person other = (Person) obj;
		if (firstName == null) {
			if (other.firstName != null)
				return false;
		} else if (!firstName.equals(other.firstName))
			return false;
		if (id != other.id)
			return false;
		if (lastName == null) {
			if (other.lastName != null)
				return false;
		} else if (!lastName.equals(other.lastName))
			return false;
		return true;
	}

	@Override
	public String toString() {
		return "Person [id=" + id + ", firstName=" + firstName + ", lastName=" + lastName + "]";
	}

}

Despite the only business meaningful part of the code being the three member fields; id, firstName, lastName, it would take nearly 80 lines to define the class so it could be properly used in a Java application (which would often requires being compatible with popular frameworks). With Records, the above can instead be declared in a single line:

public record Person(long id, String firstName, String lastName){}

Note: Records are shallowly immutable, which is a bit different from how many data carriers are currently defined in Java projects, like the initial Person example, which typically Getters and Setters to be compatible with frameworks. Frameworks are being updated to be compatible with Java 16, and thus Records, and you can view their status here: https://wiki.openjdk.java.net/display/quality/Quality+Outreach.

Then when the above code is run through the Java compiler the below is produced:

public final class com.bk.example.Person extends java.lang.Record {
  private final long id;
  private final java.lang.String firstName;
  private final java.lang.String lastName;
  public com.bk.example.Person(long, java.lang.String, java.lang.String);
  public final java.lang.String toString();
  public final int hashCode();
  public final boolean equals(java.lang.Object);
  public long id();
  public java.lang.String firstName();
  public java.lang.String lastName();
}

The benefits of being able to define a data carrier class in a line or two of code, what would previously had taken dozens of lines of code are pretty straightforward. Though there are a number of other benefits Records provide, which if you would want to learn more about, I would highly recommend these two episodes of the podcast Inside Java; “Record Classes” with Gavin Bierman and “Records Serialization” with Julia Boes and Chris Hegarty.

Note: If you are wondering why the compiled code doesn’t have “Getters” and “Setters”, nomenclature that comes from the JavaBeans standard, be sure to read this article that covers some of the design considerations around Records.

Local Records

Like a normal Java class, a Java Record can also be defined with in the body of a method. However, whereas defining a data carrier class within a method body was often impractical due to impacts on the readability of code, Records impose no such liability. Let’s see how Records can be leveraged to make light data transformation easier.

In this simple code example I am printing to console a list of Persons I am retrieving from a repository:

public class PersonService {

	private PersonRepo repo = new PersonRepo();

	public void printPersons() {
		repo.getAllPersons().stream().forEach(p -> System.out.println(p.toString()));
	}
}

The above code when executed would print out the following:

Person[id=1, firstName=Tony, lastName=Stark]
Person[id=2, firstName=Bruce, lastName=Banner]
Person[id=3, firstName=Sam, lastName=Wilson]
Person[id=4, firstName=Monica, lastName=Rambeau]
Person[id=5, firstName=Wanda, lastName=Maximoff]

When presenting information to users it’s often not desirable to include meta information like id. Users typically wouldn’t be interested in such information and I might want to keep such information private for reasons from security to having more flexibility when changing metadata values.

With Records I can easily define a new data carrier class in the body of printPersons() that can handle the light transformation of stripping out the id field like seen here:

public void printPersons() {
	record PersonView(String firstName, String lastName) {}
	repo.getAllPersons().stream().map(p -> new PersonView(p.firstName(), p.lastName())).forEach(pv -> System.out.println(pv.toString()));
}

Running the above code will produce the following output:

PersonView[firstName=Tony, lastName=Stark]
PersonView[firstName=Bruce, lastName=Banner]
PersonView[firstName=Sam, lastName=Wilson]
PersonView[firstName=Monica, lastName=Rambeau]
PersonView[firstName=Wanda, lastName=Maximoff]

This is good, but sometimes during data transformations there might be some additional behavior we need to have happen, beyond the simple moving around or stripping out of fields. Luckily the default behavior of a Records class can also be easily overwritten. If for example I wanted to provide even cleaner output, I can simply override the default toString() method with my own, like in this example:

public void printPersons() {
	record PersonView(String firstName, String lastName) {
		@Override
		public String toString(){
			return firstName + " " + lastName;
		}
	}
	repo.getAllPersons().stream().map(p -> new PersonView(p.firstName(), p.lastName())).forEach(pv -> System.out.println(pv.toString()));
}

Which prints this to console:

Tony Stark
Bruce Banner
Sam Wilson
Monica Rambeau
Wanda Maximoff

Records allow for plenty of flexibility, equals(), hashcode(), and the accessor methods of a Record class can all be overwritten if needed. Custom behavior can also be added to the constructor, such as checking for null values, though the Java compiler will ensure all member fields of a Record are being assigned a value, and if not, add an assignment operation automatically. Custom methods can also be added if needed as well. For example a toJson() method could be defined for formatting the contents of a Record as a JSON message.

Conclusion

Java 16 is scheduled to go GA March 16th and with it fully bring Records to the Java ecosystem. In this article we saw how Records will provide some significant ergonomic benefits to Java developers when performing the common task of transforming data.

If you would like to check out Java Records for yourself, along with the other new features coming in Java 16, you can download the Java 16 JDK here: https://jdk.java.net/16/.

You can find the example code used in for this article along with instructions on how to run it on my github profile: https://github.com/wkorando/transformation-with-java-local-records

Three Podcasts to Get You Started on Kubernetes

Over the past couple of years I have become a big fan of podcasts. They are a great way to help pass the time while working out, doing chores around the house, traveling, or general background filler.

Podcasts can be entertaining like with How Did This Get Made, which gives hilarious reviews and commentary on bombastic movies, informative like with the New York Times The Daily, or even help you learn a new language. I listen to a number of tech podcasts as well. For my role as a developer advocate, tech podcasts help to keep me informed on trends and practices of the industry and even get in-depth on a specific technology or practice.

Kubernetes has become an incredibly popular topic to learn about in the years since it was introduced. However in my experience with Kubernetes it can be difficult to know where to get started as it is covering a lot of different concerns. In this article we will look at three podcast episodes each of which take a different approach to covering Kubernetes; first a high level overview of Kubernetes, why it was created and what problems it’s trying to address, a second that gets hands and technical with some of the core concepts of Kubernetes, and finally a podcast that gives a look as to what it’s like to run Kubernetes in production. With that let’s get started.

GettingStartedK8s

Getting a High Level Understanding of Kubernetes

Screen Shot 2020-04-16 at 11.05.18 AM

My first podcast recommendation is of my friend Josh Long‘s podcast A Bootiful PodcastIn an April 2020 episode Josh interviewed Joe Beda, one of the co-creators of Kubernetes.

This episode of A Bootiful Podcast does a great job of laying out why Kubernetes exists and the goals of the project. In the episode Josh and Joe talk about the history of Kubernetes, originally developed by Google and built off of lessons learned from developing Borg, which is the cluster manager Google developed and still largely uses internally.

If you have been hearing about Kubernetes and wondering if it makes sense to introduce at your organization, this would be a great place to start. You can listen to this episode of A Bootiful Podcast here: https://podcasts.apple.com/us/podcast/kubernetes-co-creator-joe-beda/id1438691771?i=1000470441020

Kubernetes Nuts & Bolts

Screen Shot 2020-04-16 at 11.05.08 AM

If you want to get a bit more hands on understanding of Kubernetes, then you should definitely check out Java Pub House. Also in an April 2020 episode, Freddy Guime and Bob Paulin, dig into the core concepts and features of Kubernetes.

I have long enjoyed Java Pub House because Freddy and Bob do a great job of breaking down complex technical concepts into an easy to understand format. Their episode on Kubernetes was no different as they cover containers, pods, services, networking within a Kubernetes cluster, and other key concepts. While I have been doing a crash course on Kubernetes over about the past two years, I still learned a number of new things from listening to this episode. So even if you already have some hands on experience with Kubernetes, this episode of Java Pub House is still worth a listen.

You can listen to Java Pub House‘s episode of Kubernetes here on Apple Podcasts: https://podcasts.apple.com/us/podcast/episode-89-kubernetes-oh-container-orchestration/id467641329?i=1000471313601

Kubernetes in the Wild

Screen Shot 2020-04-16 at 11.23.03 AM

Understanding the high level overview and history of Kubernetes is great, and getting hands on can help you setup a proof-of-concept Kubernetes cluster, but nothing can match that day-to-day lived experience of running Kubernetes in production. Which is what we get in a February 2020 episode of Software Defined Talk, when Michael Coté interviewed Charles Lowell on his experience of working with Kubernetes in production.

I found this episode deeply interesting. As mentioned above, I have been learning about Kubernetes for about the past two years, and while I can see the potential of Kubernetes, my practical experience of running Kubernetes on production workloads is limited. So hearing Charles talk about his experience of using Kubernetes to run production workloads was helpful. Coté does a great job of keeping the interviewed grounded for people who are still learning about Kubernetes themselves.

If you want to listen to this episode of Software Defined Talk you can check it out at this link on Apple Podcasts: https://podcasts.apple.com/us/podcast/episode-218-kubernetes-for-developers-with-charles-lowell/id893738521?i=1000465636468

Conclusion

Podcasts can be a great opportunity to learn about the current trends and practices in software development. Technologies like Kubernetes are very complex and at times difficult to understand because they are trying to address many different problems; load balancing, ease of deployment, networking, etc.. These three podcast episodes do a great job of explaining Kubernetes at three different levels and I would highly recommend checking not only these episodes of the respective podcasts, but consider subscribing as well as each have podcast has a number of great and informative episodes.

Capturing Desktop and Zoom Audio in OBS on macOS

Because of the COVID-19 pandemic, many in person events like meetups and conferences have gone digital. We have done that with the Kansas City Java Users Group I help organize, I have also seen similar trends from fellow user group and event organizers.

In the push to go digital, many have turned to two popular tools; OBS and Zoom for handling livestreams. For macOS users it is surprisingly difficult to capture desktop and zoom audio. This article is a step-by-step guide for capturing desktop audio and also audio from a zoom call in OBS.

Prerequisites and Priors

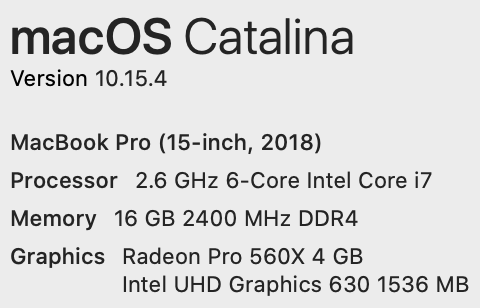
This article assumes you have OBS and Zoom already installed on your system. Additionally I have asked some colleagues to run through these steps, and they have done so successfully, but their computers and mine are setup similarly to this:

System-Setup

Capturing Desktop Audio on macOS

For reasons, capturing desktop audio isn’t an intrinsic feature in macOS, so you will need to download a third party tool to do this. I’m following the advice from this YouTube video. So here are the steps.

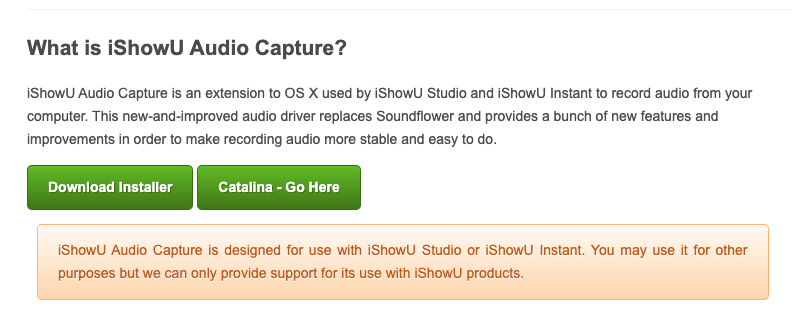
  1. Install IShowUAudio, you should be presented on a screen that looks like below, for macOS Mojave, or later click the button to the right and click the download button on the following page.  IShowUAUdio download
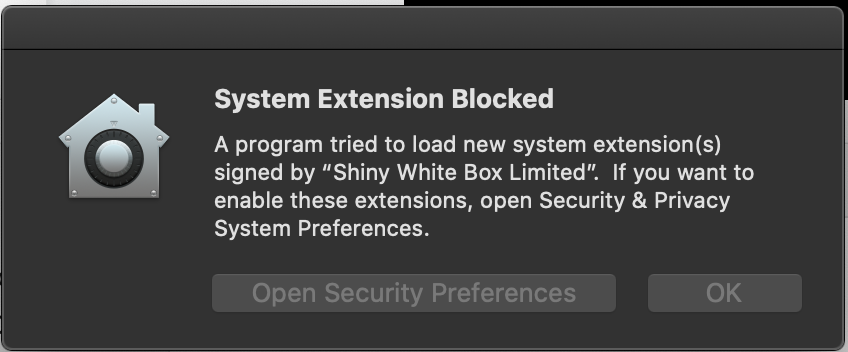
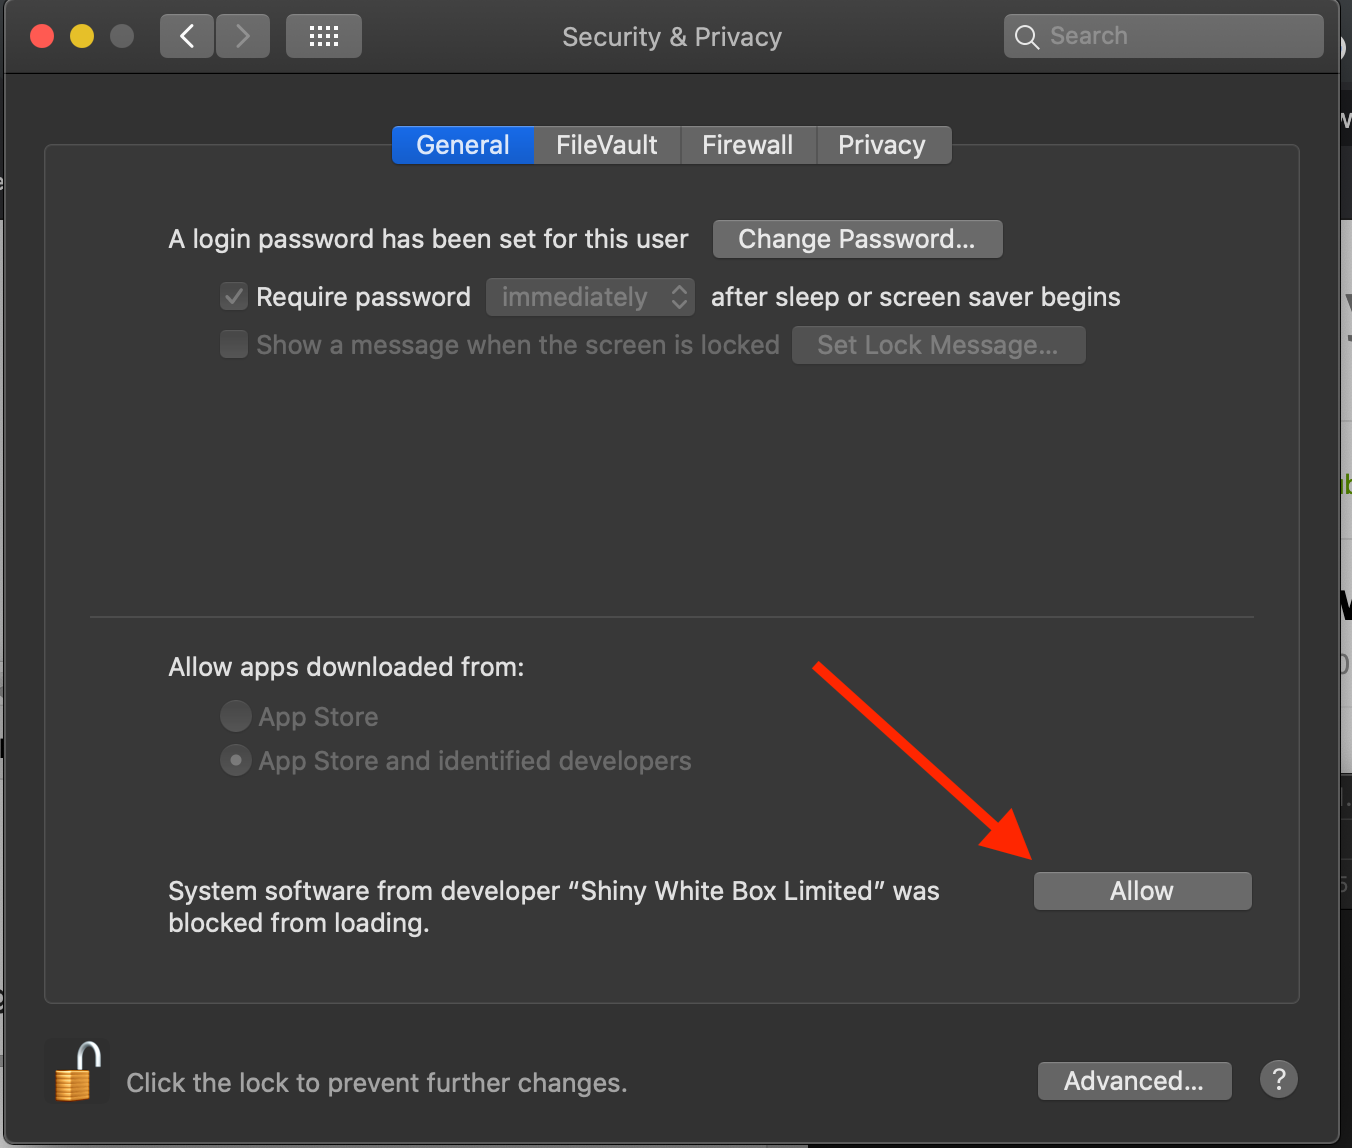
  2. When installing IShowU Audio you will need to give IShowU Audio permissions (read below if you are not prompted during install):permissions-2permissions-1
    Note: If you are not prompted during install, then hit “command + space” to bring up spotlight and search for “Security & Privacy”, you should see an image similar to the above.
    For more info check Shinywhitebox’s documentation here.
  3. Once the installation is complete, restart your computer

Configuring Output Device

With IShowUAudio installed, the next step is to configure an audio device. This will allow us to capture desktop audio, while also hearing that audio as well.

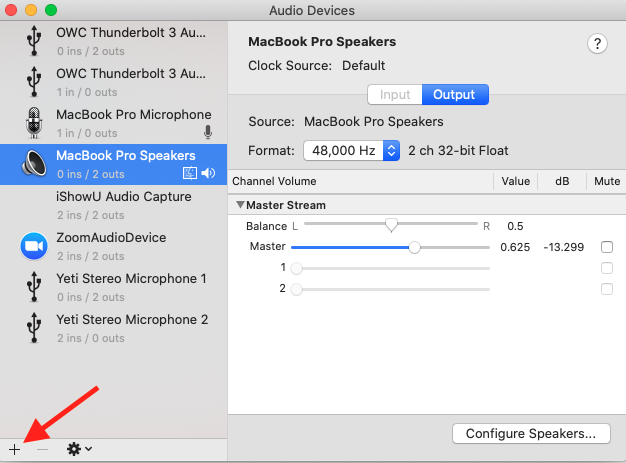
  1. Hit command + space to bring up the system spotlight and search for “Audio MIDI”audioMidi
  2. Click the little “+” in the bottom left hand corner of the dialog box and select “Create Multi-Output Device”multioutput-part1
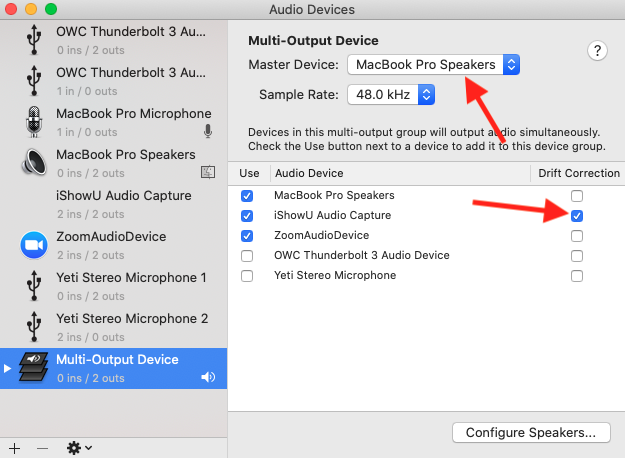
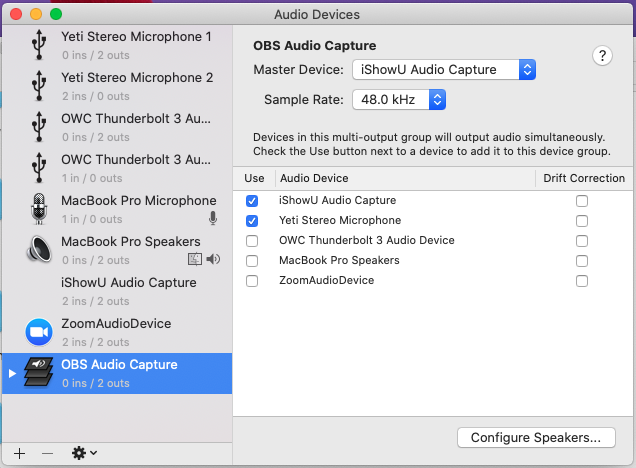
  3. You will be presented with another dialog box that looks something like below, note the arrows and run through the steps after the picturemultioutput-part2
    1. Click the “master device” dropdown in the top center of the dialog and select “iShowU Audio Capture”
    2. Select “iShowU Audio Capture” as one of the audio devices
    3. Select any other appropriate output devices from this list for your setup, they will be your “pass through” so you can hear what OBS is capturing.
      Note: If you are planning on using a bluetooth headset and you are planning on using its built in microphone read the “known problems” section

      1. Uncheck “Drift Correction” for all devices if selected
      2. (Optional) Click on the “Multi-Output Device” label in the device’s list on the left hand side of the dialog box and give it something more memorable I used: OBS Audio Capture
  4. Once you have run through the above steps your screen should look something like this:multioutput-part3
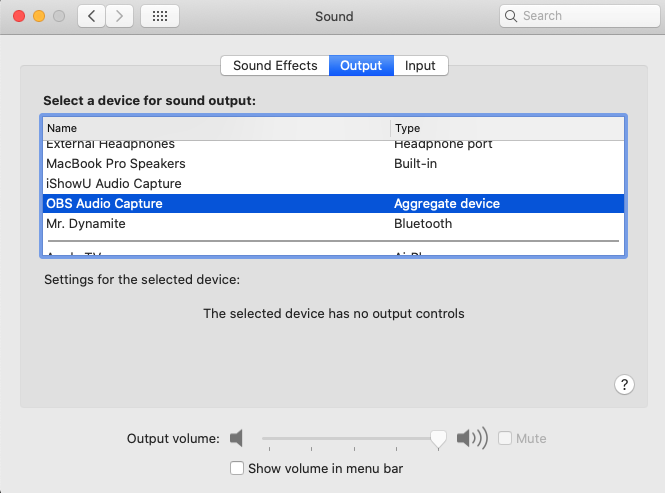
  5. Hit “command + space” to bring up spotlight and search for “Sound”
  6. Click “Output”
  7. Select the Multi-Output Device we just created (i.e. “OBS Audio Capture”):mac Sound

Configure OBS to Capture Desktop Audio

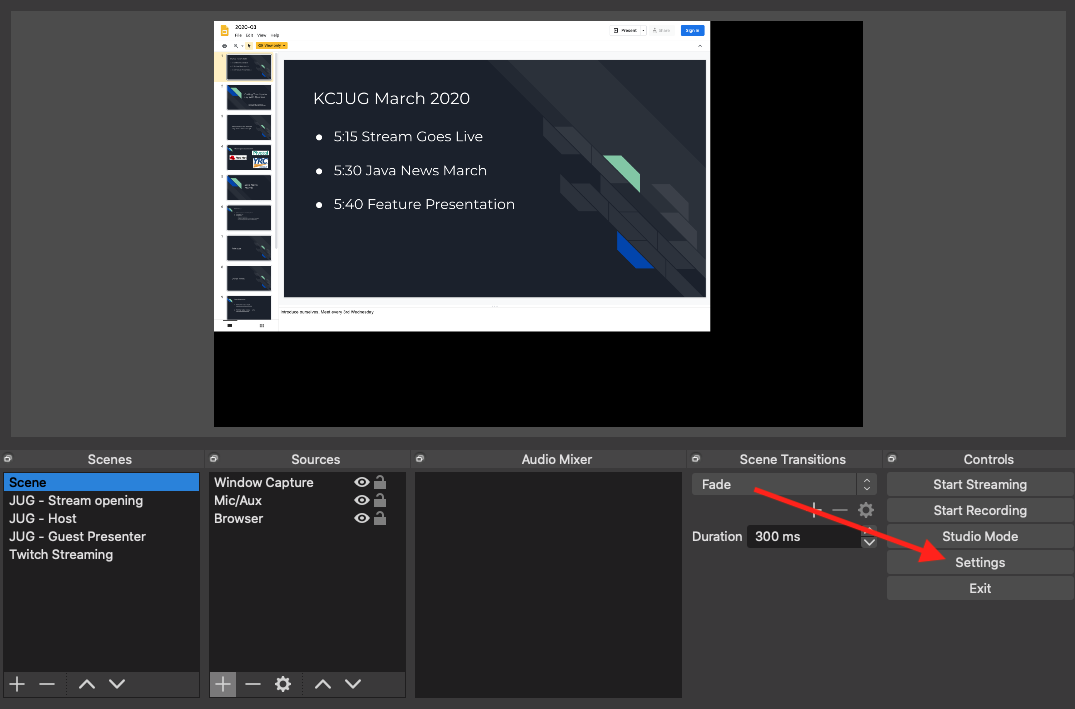
We will now need to go into OBS to configure it to use the audio device we just setup to capture audio. With OBS open run through the following steps:

  1. Click on “Settings” in the lower left hand side of the screenOBS Setup - part 1
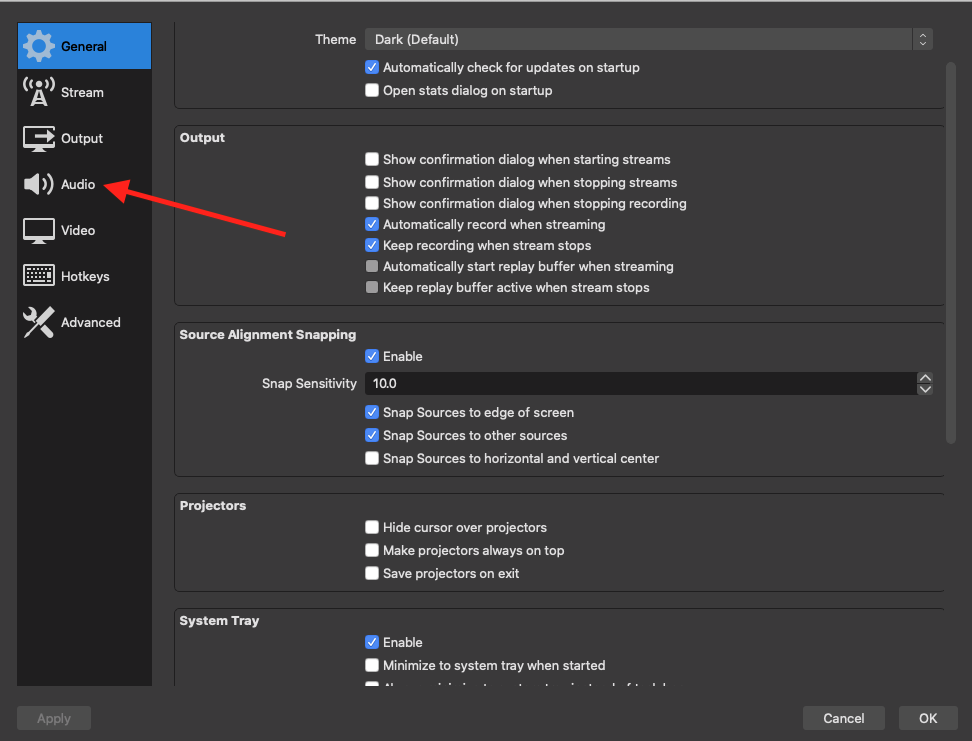
  2. Click on Audio in the dialog pop-upOBS setup - part 2
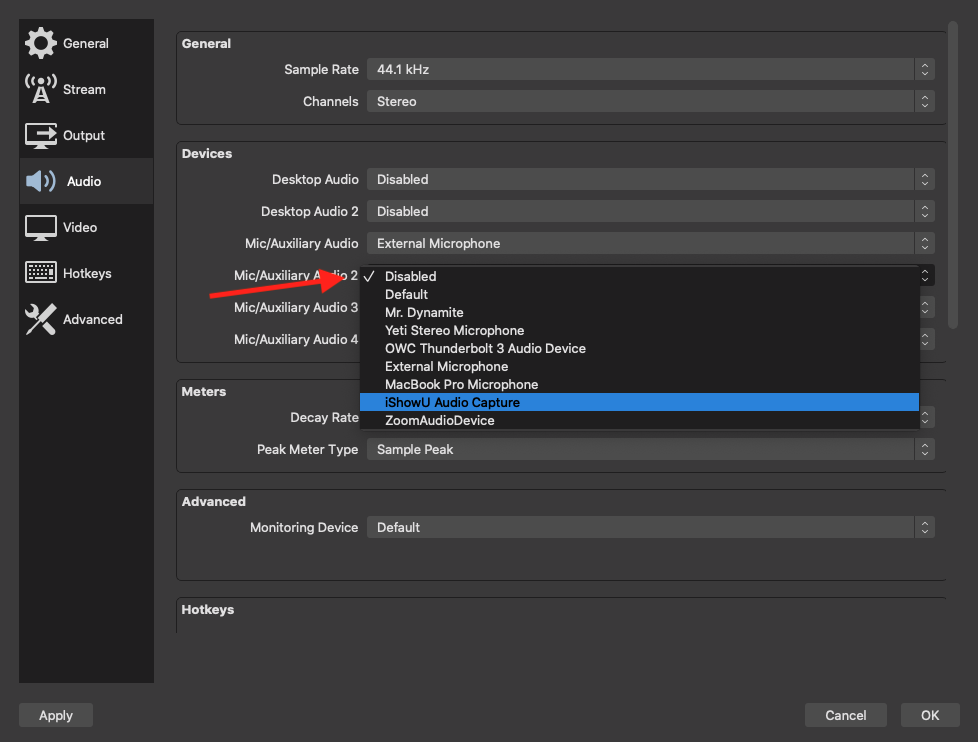
  3. Click on the dropdown for Mic/Auxiliary Audio 2 (or some other free option) and selection “IShowU Audio Capture”OBS setup - part 3
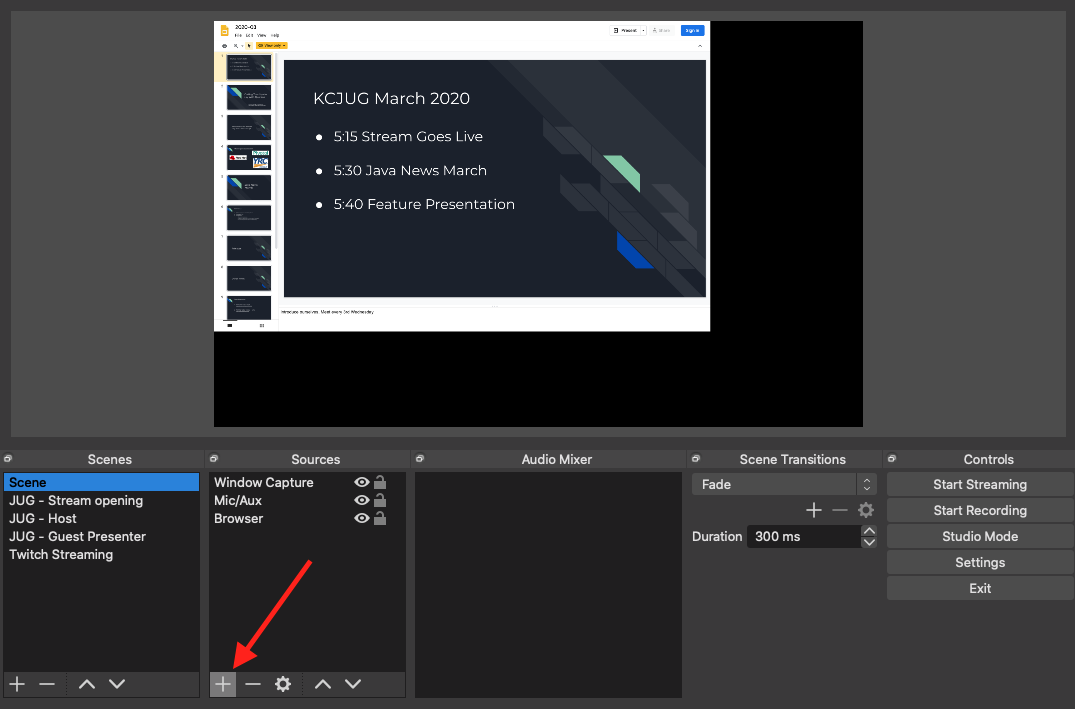
  4. Click the “+” button under sources for a sceneOBS Setup - part 4
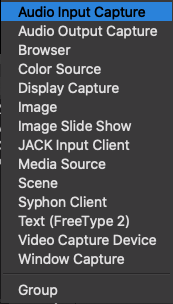
  5. Select “Audio Input Capture”
    OBS Setup - part 5
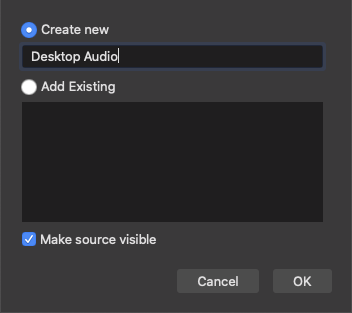
  6. Give a descriptive name for the audio source (e.g. “Desktop Audio”)
    OBS Setup - part 6
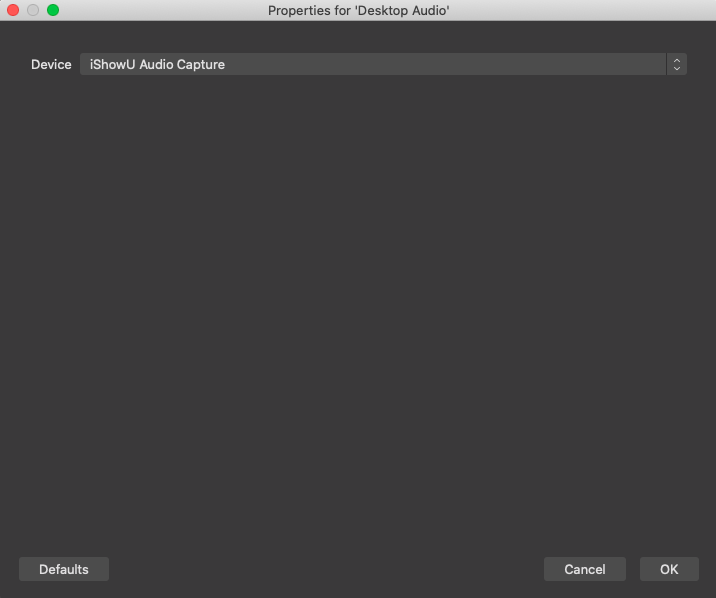
  7. Select “iShowU Audio” as the deviceOBS Setup - part 7
  8. You should now be capturing desktop audio, try playing a video or music to make sure sound is being captured (the sound bar should move)
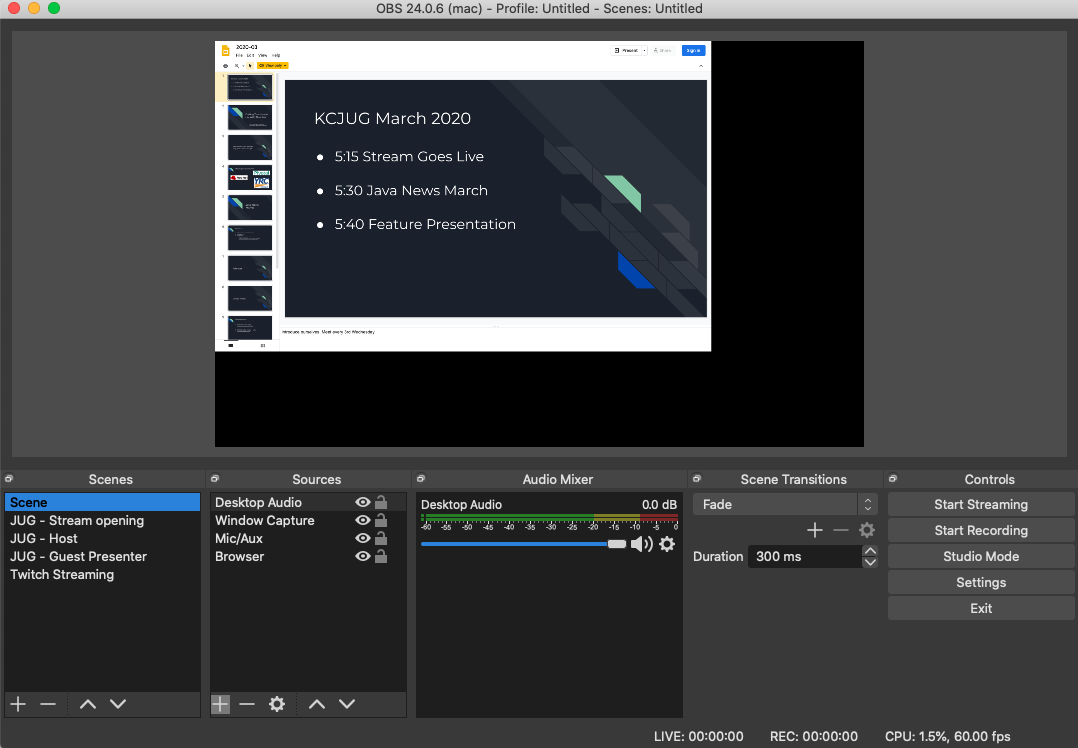
    Note: See below if you are not hearing any sound, if nothing is being captured run through the previous two sections again to make sure you did everything rightOBS Setup - part 8

Configure Zoom to Allow OBS to Capture Its Audio

You will need to do a couple of steps to capture audio from a zoom call. If you haven’t already start Zoom.

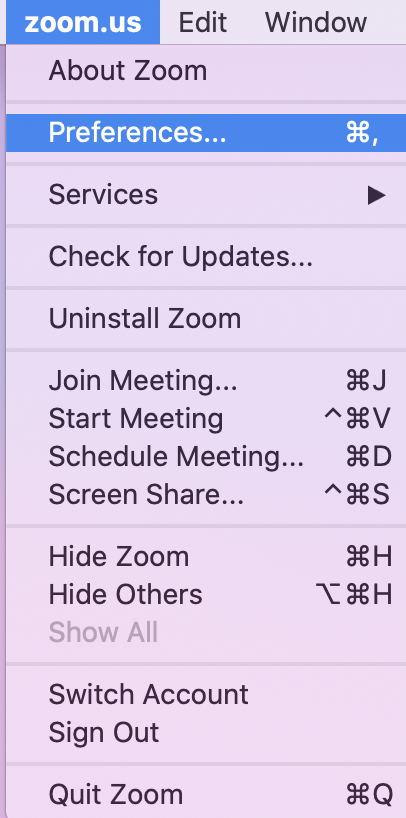
  1. Make sure Zoom is your active program and open it’s preferences, top left of the desktop
    Zoom Setup - Part 1
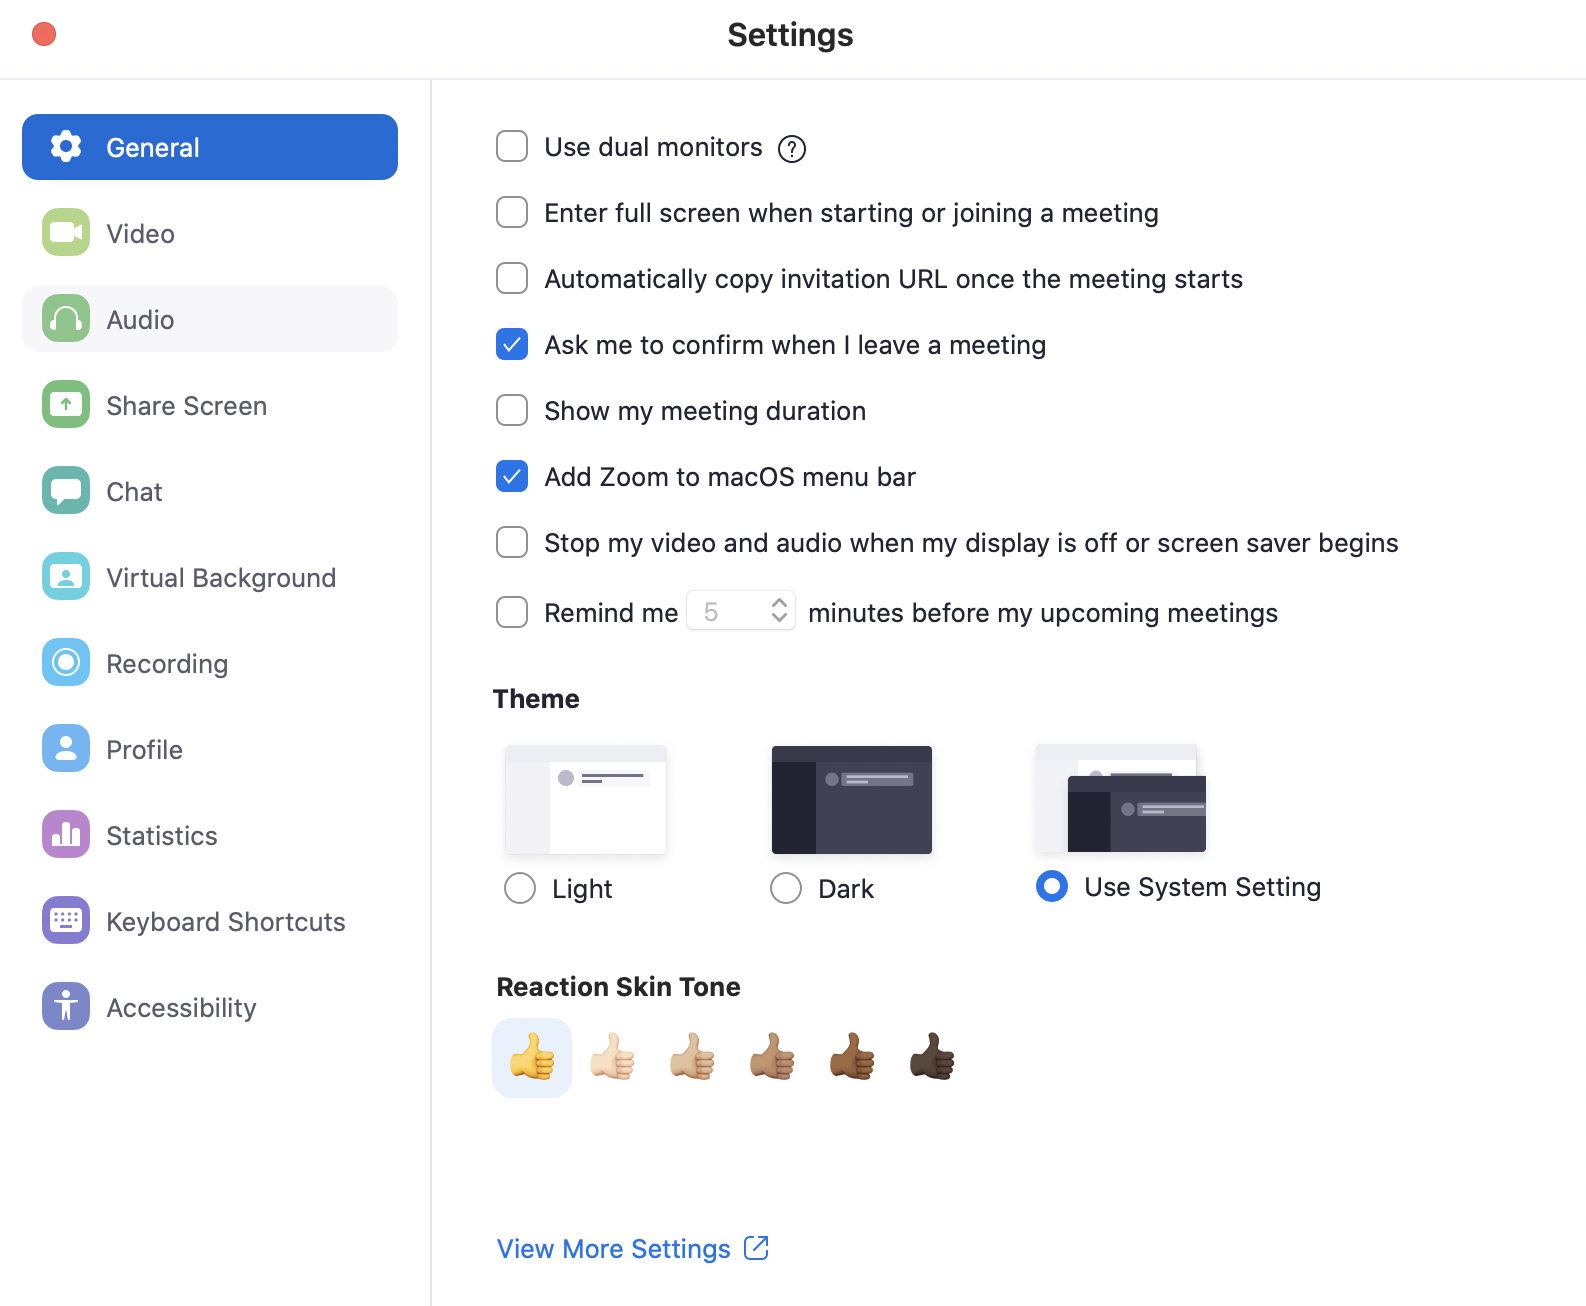
  2. Select audio on the right side of the dialog boxZoom Setup - Part 2
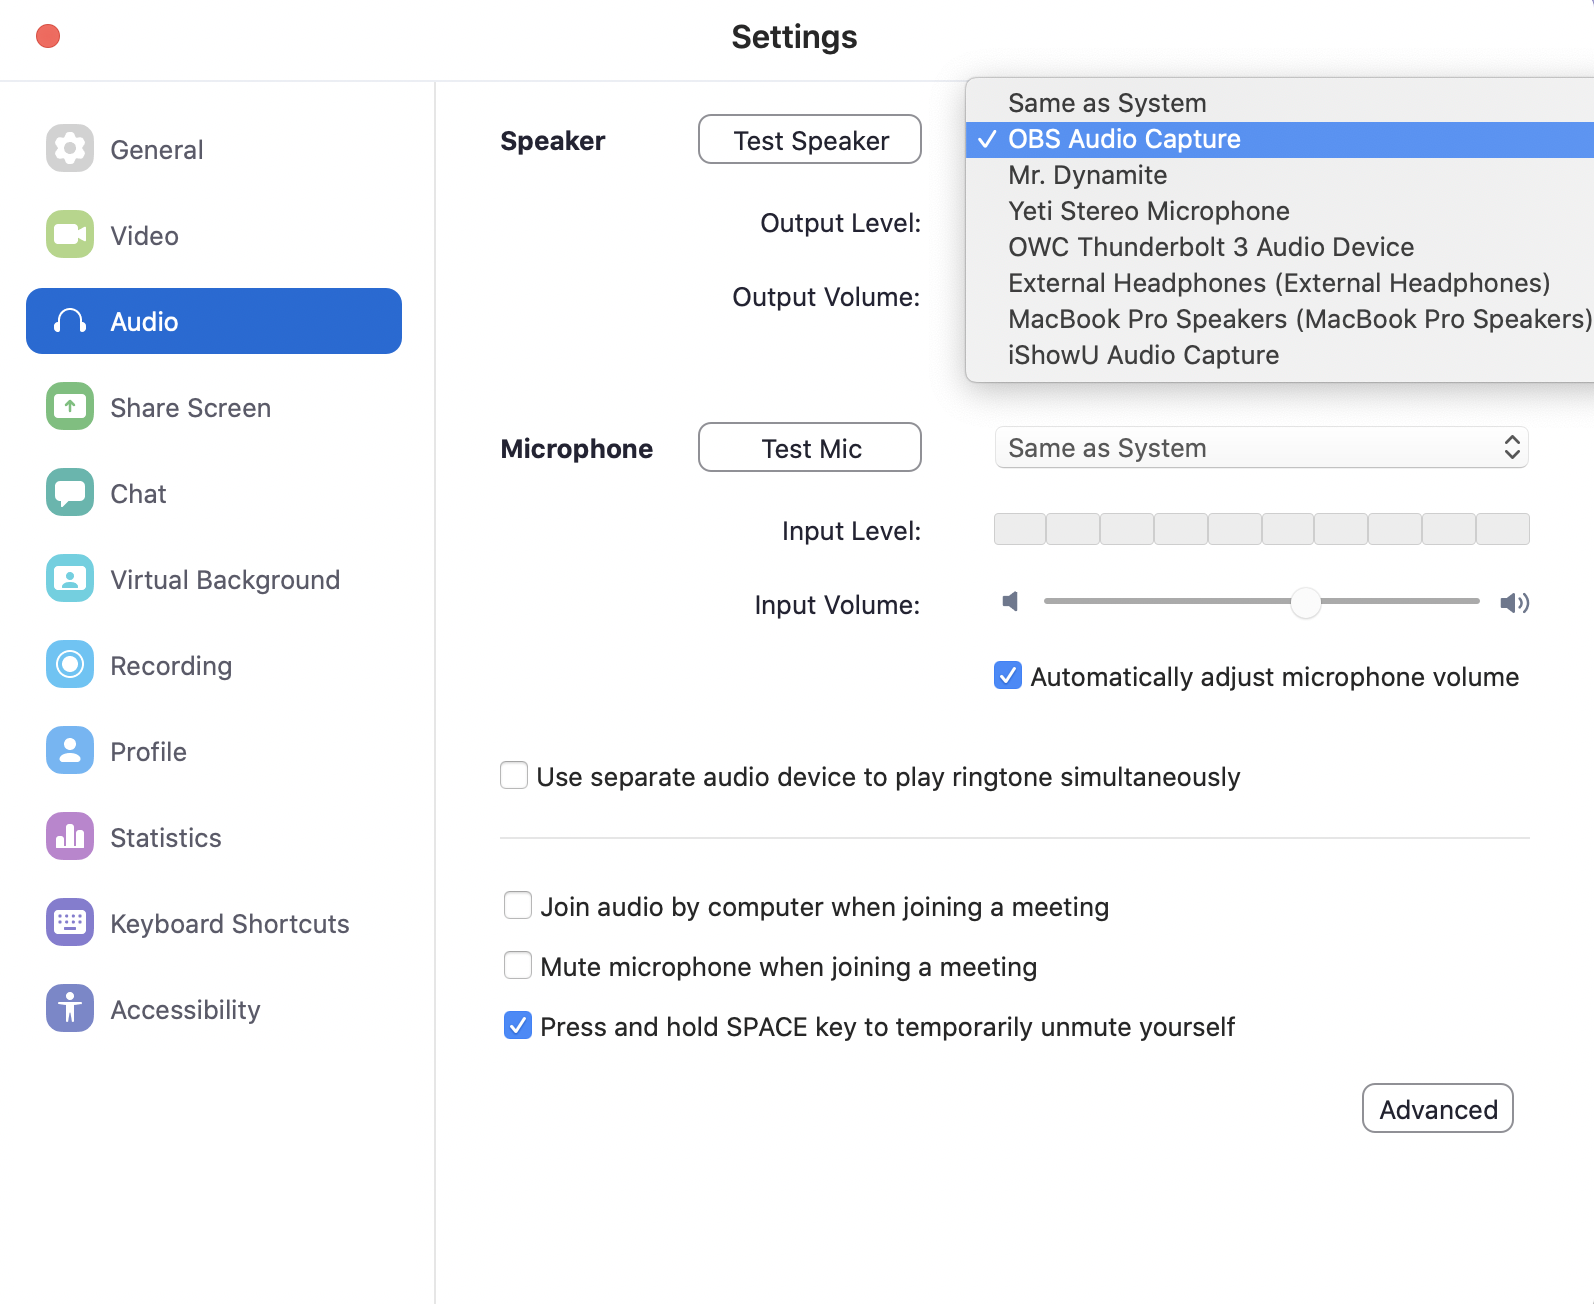
  3. Open the speaker dialog box and select the multi-output device created earlier (e.g. OBS Audio Capture)Zoom Setup - Part 3
  4. Click “Test Speaker” and verify in OBS that audio is being captured

Known Problems

Below are some common problems/issues I have ran into:

  • OBS is capturing audio, but I’m not hearing anything – If OBS is capturing audio, but you can’t hear anything coming from your computer one of a few things could be an issue
    1. Make sure the “pass through” audio device you configured during the “multi-output device” section is what you are using to listen to audio
    2. Make sure your computer output is going to the “multi-output device” you setup earlier (command + space and search for sound and select output)
  • My computer audio is messed when not using OBS – When not using OBS, you probably want to use a different audio setup, e.g. using your computer’s speakers. Open up Sound in system preferences (Command + space) and under “output” select the preferred device for output
  • Bluetooth headsets – Using the integrated microphone on bluetooth headsets seems to create a feedback loop. This won’t affect the audio being captured by OBS, but is distracting/disorientating. 

Conclusion

Livestreaming is a new world for many as we deal with the ramifications of quarantines and social distancing brought on in response to COVID-19. Hopefully this guide addresses an issue I quickly ran into when trying to use OBS on macOS. Please leave a comment or reach out to me on twitter if you have any questions or feedback about this article.

Sources for configure IShowU Audio & Multi-Output Device: https://www.youtube.com/watch?v=y5O6ypLAH88